PRODUCTION OF ANCILLARY PRODUCTS:
DIGIPACK:
- To apply the sepia effect to images that I had taken whilst filming I followed the tutorial found here


Confronted with the screen above I played around achieving a consistent sepia effect, it took a while to decide how light the sepia would be and even after applying the effect some correction was needed on photos in order to ensure consistent coloration throughout the digipack this was done using the color picker tool and a brush
ALBUM RELEASE POSTER:
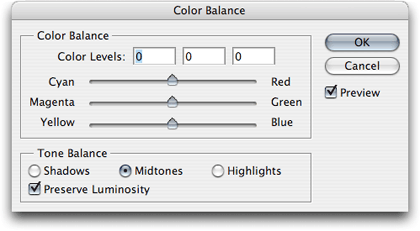
To achieve the coloration on the background image of the Album release poster I did not use the desaturation and adjustment functions as above. Instead I favored the color balance function accessed via Image/color balance or by layer/new adjustment layer / color balance . This presented me with three sliders detailing the levels of all the colors in the image. The default reading is 0 for all sliders and so I set about investigating what the effect of emphasizing certain tones would have on the image. Eventually, I decided emphasizing the main part of the picture the sky would be most effective so I decided on increasing the blue and the cyan balance. This had the desired effect whilst also darkening the tree and buildings in the image. To combat this I had to alter the sliders for the shadows section. However, this was relatively simple with the instant preview once again proving useful.
MAIN PRODUCTION PIECE:
As detailed on the main page my main piece of work, the music video relies on several video effects to overcome some footage issues and also to create some semiotic meanings.
SEMIOTIC MEANING:
To create the effect of a flashback, I decided a black and white carried that particular meaning to the audience. Thus the effect had to be applied to all footage in the past shots with alcohol and shots walking by the river. To do this I utilized Imovie's inbuilt effects editing suite. Accessed by double clicking on a clip.

I also experimented with rewinding certain clips in order to create this feeling of going back to the past and although possible. However,I did not think it suited the music video genre and that it may create confusion
for the audience. Below, are screenshots of the inspector from which reverse playback can be initiated, it is located under the speed options, after experimentation I decided it could only be used in two places , to reverse the direction of the hands on the mixing desk in one shot and to reset the glass representative of communion, in order to imply that this process is continual.


OVERCOMING FOOTAGE ISSUES
Also shown by this image is the ability to use stabilization on wobbly footage. This works by analyzing the zooming of the camera during the piece and its distance from the subject and then selecting a suitable zoom so that the majority of the frame is stable. I used this function in post production in order to establish which parts of the footage recorded where suitable and stable to be used. The fact that some footage was still noticeably wobbly after stabilization proved that it was not usable and led to lots of reshooting.
Due to the wide variety of locations I was shooting in and some equipment being unusable, dollies on muddy ground, I decided that I could use post production to overcome issues and create varied shots from just one continuous shot. One method I used to achieve this was Imovie's Crop, Fit and Ken Burns feature all located under the Crop icon adjacent to the microphone icon.

Using Ken Burns I was able to instigate panning effects both vertical and horizontal from stationary shots. Consequently full body pans whilst the star was playing became possible and the fact that they were computer generated meant that they were smooth and more regular than manual pans.
No comments:
Post a Comment